

Intuit QuickBooks is the most lovable and famous accounting software that has been used by the global leaders. It comprises numerous features which keeps the businessmen’s away from the stress and tension of maintaining their business accounts. According to the survey of QuickBooks software, it has been seen that some frequent common QuickBooks errors occur due to the same reason. In this post today we are going to discuss about one of the frequent error (QuickBooks Error Code 12157) that occurs in QuickBooks due to many reasons. Know all the possible causes with quick troubleshooting steps to overcome from this error.
Common Internet Connectivity Errors
Due to the internet connective few error codes usually appears. It might be possible that there are no specific warning messages or simply just show any of the error code given below:
- QuickBooks Error Code 12045
- QuickBooks Error 12157
- QB Error 12031
- QB Error Code 12037
- QuickBooks Error Code 12007
What are the causes of QuickBooks error code 12157?
- You can have a comprehensive selection of framework conflicts, PC registry errors, and Active X problems
- Some Firewall program restricted setups and Internet safety applications
- Many QuickBooks software variations released on the same year on the very same computer system such as:
- QuickBooks Desktop Pro 2016
- QuickBooks Desktop Enterprise Solutions 16.0
- Conditional firewall software settings and web protection applications, Specific Internet or Protection apps could appear while updating the desktop computer software of QuickBooks.
Solution of QuickBooks Error Code 12157
Check out the following methods to remove the QuickBooks error code 12157 given above. However, if you are looking for quick help to resolve QuickBooks errors.
Method 1: Verify the date and time in the computer
- First of all, You need to Perform a right-click on the clock in the bottom right corner of the computer
- Next, Choose the Adjust Date/Time
- After that Select the Change date and time and then, enter the today’s date & time
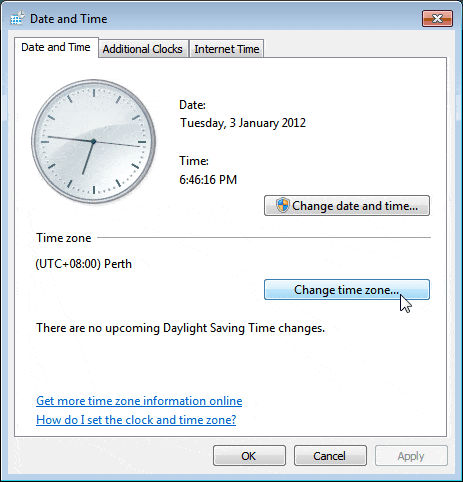
- Next, Hit the OK key
- Now Close & reopen the QuickBooks Desktop
- Finally, update the QuickBooks Desktop software
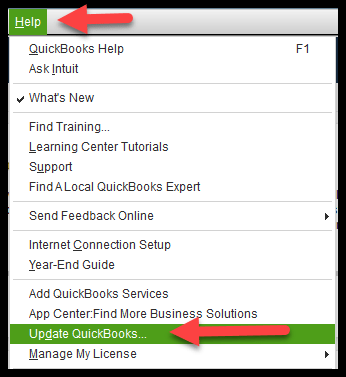
Method 2: Verify the Internet Connection Settings
- First of all, Test the secure internet connection by opening the web page of the Chase banking.
- You won’t be allowed to update the QuickBooks, if you are unable to open the Chase banking. It is recommended for you to contact the Internet Service Provider (ISP) for support and Help
- If you are able to see the Chase banking page, you can proceed with the steps given below:
- Select the Help => Internet Connection Setup
- Next, Choose the Use my computer’s Internet connection settings to establish a connection when this application accesses the Internet, & select the Next
- Now Select the Advanced Connection Settings
- Next, In the Advanced tab, select the Restore Advanced Settings
- After that Choose OK then Done
- Lastly Update your QuickBooks Desktop
Method 3: Internet Security or Personal firewall Application Configuration
Make sure that the internet security & personal firewall settings are configured accurately. The Port 80 & 443 must be enabled and access must be provided to the following files:
Place the specific firewall ports according to the version of the QuickBooks Desktop:
- QuickBooksMessaging.exe
- QBServerUtilityMgr.exe
- QBGDSPlugin.exe
- QBDBMgr.exe
- IntuitSyncManager.exe
- FileManagement.exe
- Dbmlsync.exe
- AutoBackupExe.exe
- DBManagerExe.exe
- FileMovementExe.exe
- QBCFMonitorService.exe
- QBDBMgrN.exe
- QBLaunch.exe
- QBW32.exe
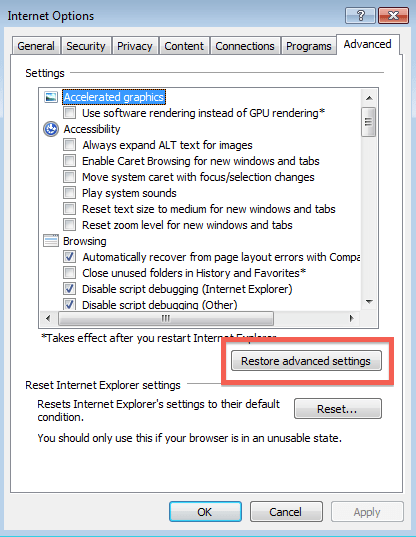
Method 4: Restore Advanced Settings
- Close QuickBooks desktop
- Open Internet Explorer
- Click on the Tools tab at top right and then from the drop-down select Internet options
- Next, press Advanced Tab
- Select Restore Advanced Settings option and close the Window
Method 5: Restore the System
- System Restore too can help you fix files and data that may be behind this error. The following are the steps you can perform:
- Login to QuickBooks as an Administrator
- Press the Windows key on your keyboard or Start button on the bottom-left of your desktop
- Select All Programs and then select Accessories
- Press System Tools
- Press System Restore option
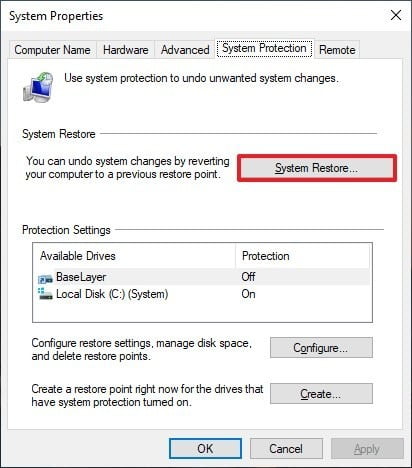
- Next, open a new window
- Click on Reinstall this PC and then press the Next button
- Select system restore point and click the Next button
- Click advanced system to restore your computer to that point
- Hit Next at the bottom of the confirmation window
- Reboot your system for changes to save
Note: It might be possible that all the ports mentioned above are used for some of the other purposes. In that scenario, a fallback port 56719 would prefer to use for the QuickBooks Database Server Manager.
Final Note…!
We understand the technical issues through which a user goes. That’s why Host Docket provides expert and professional QuickBooks Help & Support for the entire issues related to QuickBooks software such as Integration, Updates, Data Loss, and QuickBooks related Errors & Issues.
For quick and better technical support, you can contact the team of certified experts at +1(888)996 2595. However, Our Intuit Certified experts are well experienced, polite, and professional so do not hesitate to make a call on our helpline number.


0 Comments