
QuickBooks Error code 403 occurs when a user tries to download and install the updates released by Intuit for the current version of the QuickBooks. The sole problem is that this software is unable to access the website due to settings of the Internet.
QuickBooks minor updates are meant to fix the glitches and bugs faced by the user in the current version of QB software and the Payroll software. Plus the updates given by Intuit are meant to enhance the performance of the software resulting in the unmatchable experience for the user.
Error Code Description:
Error 403: Access Forbidden or Access Denied
Reason for QuickBooks Error 403
The main reason behind the Error Code 403 is that the user is restricted to connect with the Web. Thus, the software is unable to access the information and download the updates from the Internet.
Look at the list of the reasons mentioned below:
- User Permission Settings
- Web’s Company Policies
- Settings of Firewall security are inappropriate
- The issue with the router
Solution for QuickBooks Error Code 403
Below we have discussed the steps to fix this Error Code 403:
STEP 1: Repair Registry Entries Associated with Error 403
- Firstly click on the Start button
- Type “command” in the search box and do not hit on entering button yet
- Hold Ctrl+Shift on your keyboard and then hit Enter
- You will be directed to a permission dialogue
- Click on Yes
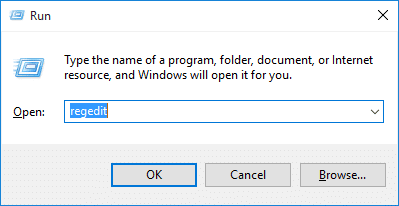
- Type “regedit” and click on Enter
- Select the Error 403 related key you want to back up, in the registry editor
- Click on the File menu and then select Export
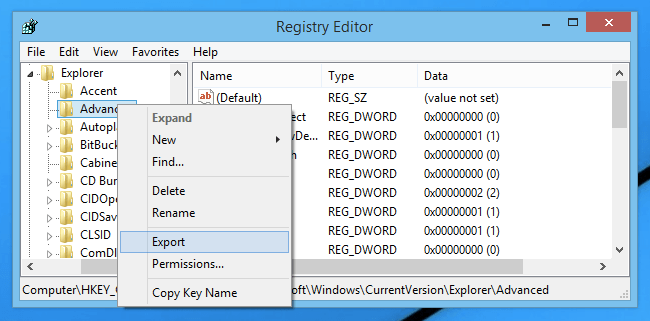
- Go to Save In list and choose the folder where you want to save the QuickBooks backup
- On the File Name box and then type a name for your backup file like “QuickBooks Backup”
- On the Export Range box make sure that “Selected Branch” is chosen
- Click on Save
- Save the file under the extension as .reg file extension
- Now you have the backup of your QuickBooks-related registry entry
STEP 2: Conduct a Full Malware Scan of your computer
There may be a chance that QuickBooks error code 403 is related to a malware infection on your PC. Scan your computer and retry to work on QuickBooks.
STEP 3: Perform a Disk Cleanup
- Click on the Start button
- Type “Command” in the search box and don’t hit Enter yet!!!
- Hold Ctrl+Shift on your keyboard and hit Enter
- You’ll be redirected with a permission dialogue box
- Click on Yes
- The black box will open with a blinking cursor
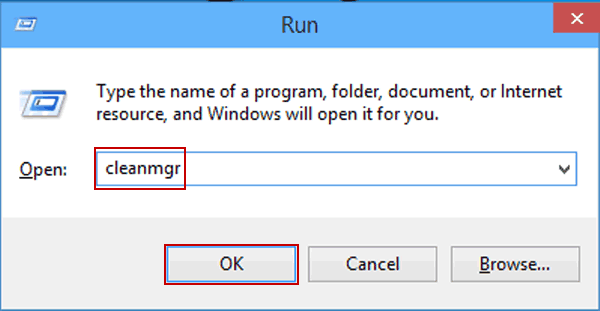
- Enter “cleanmgr” and press Enter
- Disk Cleanup will start to calculate how much occupied disk space you can claim
- In most of the common cases, the “Temporary Files” category will occupy the most disk space
- Check the boxes of the categories you want to clean
- Finally Click on OK button
STEP 4: Remove the specified proxy from Internet Options
- First of all Select the Start menu, From the Windows Taskbar
- Select Control Panel and choose Settings
- Dual click Internet Options
- On the Connections tab, select the LAN Settings button
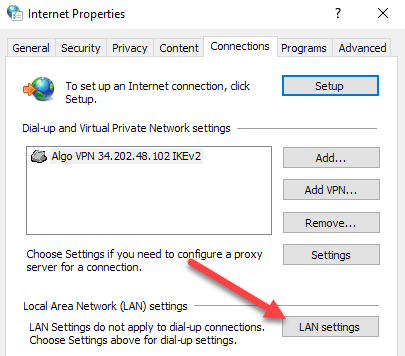
- Finally, Uncheck the checkbox under the Proxy server section and select OK button
Hopefully, the steps mentioned above did really help you in resolving your QuickBooks Error Code 403 and if in case the issue persists then feel free to seek assistance from our QuickBooks Enterprise Support toll-free Number i.e. +1(888)996 2595.


0 Comments