
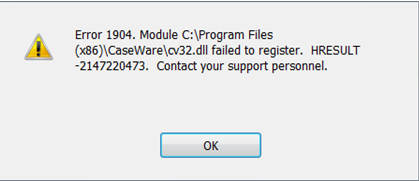
In QuickBooks software, this error is quiet common when users are installing QB files. Also it arises due to the system and all files and folders are not maintained as instantly. Error 1904 indicates ‘Failed to register’ file path/ name/ extension.
“Error 1904: [file path / name / extension] failed to register,”
The image as shown below is similar which appears on your desktop.
This QuickBooks error can also arise while QB Desktop installation after upgrading the operating system such as Windows Vista to Windows 7. Or if system wasn’t rebooted after the QuickBooks upgrade.
In case, there are multiple QB errors are appear on the display and they exclusively state the ICWrapper.dll, qbprefs.dll, RcnFndRequestHandler.dll & qbupdate.exe (among others), then the trouble is possibly caused by the Microsoft Visual C++ damaged component.
Possible Causes of QuickBooks Error 1904
What possible reasons does this error found while working on QuickBooks accounting software?
- It causes due to when your company files get damaged or corrupted in a sudden manner. It is quite possible that the settings of the file are incorrect.
- Sometimes, this QuickBooks Error could be caused due to having several multiple issues and you might receive messages mentioning specific files such as dll, qbupdate.exe & many more. This problem is usually caused when the file or a folder is damaged the MS Visual C++.
- After upgrading the operating system from one version to another, you might receive this error as it is possible that you have not rebooted your computer system after upgrading.
How to Fix Error: 1904 when you install QuickBooks Desktop?
In order to troubleshoot QuickBooks log in error 1904, Execute the following fixation steps in the order shown to resolve the problem.
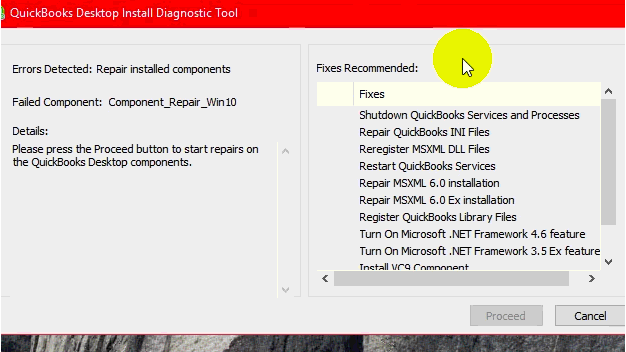
Solution 1: Run the QuickBooks Install Diagnostic tool
- Select the “Ignore” tab on the error message & let the QB installation complete. DO NOT open QuickBooks software.
- Restart the computer.
- If the QuickBooks installation did not complete, then download & run the QuickBooks Desktop Install Diagnostic Tool.
- Reboot the system.
- If running the tool unable to fix the error, then activate the built-in Administrator & install QuickBooks software under the built in administrator account.
Solution 2: Activate the built-in or hidden administrator
Follow the given steps to activate the built-in administrator:
Step 1: Activate the Built-in Administrator
- Tap the “Windows” button on the keyboard.
- Type in the “CMD”. Right-click on the “CMD/ Command Prompt/ cmd.exe” & choose the “Run as Administrator”.
- In the command prompt window, enter the “net user administrator /active:yes” and hit the “Enter” tab.
Quick tip: In case you see any error, type-in the “net user administrator /active” instead.
Step 2: Switch to the built-in Administrator Account
- Press the “Ctrl+Alt+Delete” on the keyboard simultaneously, then choose the “Switch User Windows 8 users”: hit the “Windows” button & choose the user icon on the upper right of the display.
- Hit the “Ctrl+Alt+Delete” at a time & choose the “default Administrator account” icon.
Step 3: Hide the built-in Administrator Account
- Click on the “Windows” button on the keyboard.
- Type in the “CMD” in the search box. Press right-click on the “CMD/ Command Prompt/ cmd.exe” & choose the “Run ad Administrator” tab.
- In the command prompt screen, type in the “net user administrator /active:no” and hit the “Enter” key.
Step 4: Change installation directory security settings
- Browse to the “C:\Program Files\Common Files”.
- Perform right-click on the “Common Files” folder & choose the “Properties” tab.
- Select the “Edit” icon under the “Security” tab, & then choose the “Users” under the “Group or user names” icon.
- Under the “Permissions for users” tab, choose the allow for the following permissions:
- Modify
- Read and Execute
- List Folder Contents
- Read
- Write
- Choose the “Apply” and then “OK” button.
Step 5: Do a QuickBooks Installation
- Install QuickBooks Desktop once again.
- After installing QuickBooks accounting software, switch to the original user log in.
Important Note: If you precisely followed the entire steps, then you don’t have any of the following special cases, & you’re still getting the same error, we suggest that you should contact the QuickBooks Experts to diagnose the hassle.
Special Cases:
Condition 1: If you have Bitdefender:
While QuickBooks installation on the computer in the presence of Bitdefender, you suppose to add the C:\Program Files\Common Files (for 32-bit machines) or C:\Program Files\Intuit (C:\Program Files(x86)\Intuit (for 64-bit machines) to the Bitdefender exclusion list. Turning off or disabling the Bitdefender will not resolve this problem.
Condition 2: If the error arises while Adobe Flash Player installation
- Download QuickBooks Install Diagnostic Tool and install it on your system.
- Uninstall the Adobe Flash Player.
- To open the “Run” window, press the “Windows + R” on the keyboard simultaneously.
- Type in the “Control Panel” & hit the “OK” tab.
- Choose the “Uninstall a program” icon.
- Choose the “Adobe Flash PlayerActiveX”.
- Hit the “Uninstall” button.
- Follow the instruction to complete the whole process.
- Download & install the Adobe Flash Player from official website www.adobe.com.
Condition 3: If the error references QBversionTool.dll
Solution 1: Use QuickBooks Install Diagnostic Tool
- Download & run QuickBooks Install Diagnostic Tool.
- Reboot the computer & reinstall the QuickBooks.
Solution 2: Check permissions & use hidden (built-in) Administrator account
Make a notepad file & save it to the installation directory to verify the permissions:
- Open the “Run” window, Hit the “Windows + R” on the keyboard at the same time.
- Type in the “Notepad” & click on the “OK” button
- Type in the “QBTEST” in the notepad file.
- From the “File” menu, click on the “Save As” icon.
- Save the file to the installation directory.
- 32-bitC:\Program Files\Common Files.
- 64-bitC:\Program Files(x86)\Common Files.
Some Additional Guidelines
- If you are working with QB Database Manager only, then the given solutions would not work and you would be required to install the actual exe.
- The error occurs mostly in Microsoft Windows when the installation is not run as administrator.
- Before installing Avalara Avatax, make sure that exe is installed on the server.
- The problem can also be caused if you try to Install the connector on a Server without QB exe installed on it.
- After clicking OK on the error, the installation must say that it was completed successfully.
- Go to AvaTax Configuration (File > AvaTax > Configuration)
- Run the QuickBooks Software as Administrator
- Select your Test Connection option.
Conclusion
Hopefully, this article would be beneficial for you to resolve the QuickBooks error code 1904 easily. However, if you still find it difficult or much time consuming – you can seek the high quality QuickBooks technical support from our certified ProAdvisors.
For the best accounting solution under one roof, dial our toll-free helpline number i.e. +1(888)996 2595. We will be more happy to help you.


0 Comments